This is one of my most favorite breads to make. You can use the dough for so much more then the traditional Jewish Challah braided bread. A yeast bread enriched with eggs and oil (I use melted butter).
It is similar to French brioche which you can make lovely hamburger rolls, dinner rolls and so much more.
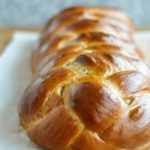
 Don’t be intimidated by this beautiful loaf of braided deliciousness. Once you get the pattern down, think over two under one.
~ GATHER UP ~
- 1 cup lukewarm water
 2 teaspoons active dry or instant yeast
- 4 to 4 1/2 cups all-purpose flour
- 1/4 cup granulated sugar
- 2 teaspoons salt
- 2 large eggs
- 1 large egg yolk (reserve the white for the egg wash)
- 1/4 cup melted butter (or you can use a non-flavored oil)
~ INSTRUCTIONS ~
- Proof your yeast! Place the water in a small bowl, sprinkle with the yeast and a healthy pinch of sugar, and stir to combine. Let stand until you see a thin frothy layer across the top, 5 to 10 minutes.
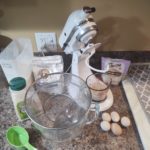
- Sift you flour! In the bowl of your Stand Mixer or bowl of choice with sugar and salt. Make a “well” I turn on the mixer using the dough hook to make the well in the middle of the flour. Pour the yeast mixture, eggs, yolk and melted butter (or oil) into the well. The dough should be shaggy, if the dough is still sticky add a little more flour a tablespoon at a time.
- Let it go! If your using a stand mixer let it run for 8 minutes. If your kneading the dough by hand, your gonna get a work out.
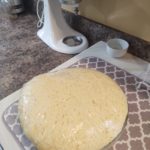
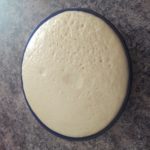
- Let it rise! Place the dough in a bowl (I use glass) that you have melted a little butter in the bottom. Cover it with plastic wrap and set it in a nice warm place for at least an hour.
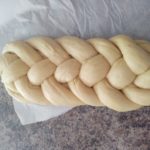
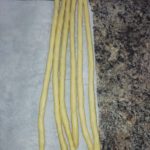
- 3 or 6 stands? Divide the dough into 3 or 6 equal pieces, depending on the type of braid you’d like to do. Roll each piece of dough into a long rope about 16 inches long. If the ropes shrink as you try to roll them, let them rest for 5 minutes to relax the gluten and then try again.
- Braid the Bread! Gather the ropes and squeeze them together at the very top. If making a 3-stranded challah, braid the ropes together like braiding hair or yarn and squeeze the other ends together when complete.
- Fancy Braid! The name of the game here is “over two, under one, over two.” Carry the right-most rope over the two ropes beside it, slip it under the middle rope, and then carry it over the last two ropes. Lay the rope down parallel to the other ropes; it is now the furthest-left strand. Repeat this pattern until you reach the end of the loaf. Try to make your braid as tight as possible. Your braid will start listing to the
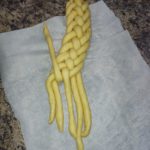 left as you go; it’s ok to lift it up and recenter the loaf if you need to. Once you reach the end, squeeze the ends of the ropes together and tuck them under the loaf. At this point, your loaf is fairly long and skinny. If you’d like to make a celebration ring, stretch the loaf a little longer and pull the ends toward each other to create a circle. You can either squeeze the ends together, or if you’re feeling adventurous, braid them into a continuous circle.
 - Let it rise again! Line a baking sheet with parchment paper. Place the braided loaf on top and sprinkle with a little flour.[I use a small sifter
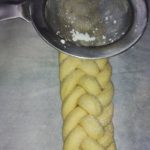 to sprinkle the flour on top] Cover with a clean kitchen towel. Let rise in a warm place away from drafts until puffed and pillowy, about 1 hour.
 - Let’s make it shine! Brush the challah with egg white. About 20 minutes before baking, arrange a rack in the middle of the oven and heat to 350°F. When ready to bake, whisk the reserved egg white with 1 tablespoon of water and brush it all over the challah. Be sure to get in the cracks and down the sides of the loaf.
- Let’s get baked! Bake the challah 30 to 35 minutes rotating the baking sheet halfway through, until the challah is deeply browned and registers 190°F in the very middle with an instant-read thermometer. I tap the loaf to see if it sounds hollow. Wahlah your done!
- Let’s Eat! Let the challah cool on a cooling rack until just barely warm. Slice and eat.